Showing posts with label sew. Show all posts

Friday, August 10, 2012

Back on the Chain, Gang

somebeachjune2012-2

Back to Blogland: I have no idea what I’m doing.  Getting an architectural license, having a baby, and obviously not blogging for over a year can make one completely forget how to publish to a blog.  I think the above picture of me is skewed, and I have no idea how to fix it. 

But I’m back to sewing, I hope.

Sewing Strips

Goal number one is to start using fabric I already own, and then, maybe finish some unfinished projects. 

To start, I’m chain sewing a bunch of 2 1/2” fabric strips I cut from fabric that I purchased too much of online.   Minimum yardage is no fun!  The plan is to turn these leftover greens and blues into a zigzag quilt. 

Monday, April 4, 2011

Fancy Four-Patch Table Runner

Jill

I can hear your applause!  Yay!  My table runner is now a finished project!

Jill's Finished Table Runner

What I thought was a simple project that finishable in an evening, took me over a week.  I suppose that’s not terrible; I technically could have never finished it.   (Lately I’ve only been finishing embroidered onesies, so I’m exceptional proud of myself for sewing something different.)  This finished project was immediately put to use, now running on the coffee table in my living room.  Perfect to complement April’s showers, the bright blues and green warm up my room with a springtime touch.

fancy four-patch

fancy table runner

I picked up this table runner kit, complete with pattern and fabric for the top and binding, from a vendor booth’s at a local quilt show.  I recognized the proprietor of the booth as also being local, one of the “generations” at Generation’s Quilt Shop in Pottstown, PA.  I’m sure that if you stopped by the shop, you could probably pick up this kit, but if you just can’t make it to town, the fabrics were from Robert Kaufman’s Dill Blossoms fabric line and the simple pattern was nicely laminated on a two-sided card from Pieced Tree Patterns.

Here’s my Fancy Four-Patch Table Runner in its current resting place.  It was a beautifully sunny, 75 degree day here, so I’ll have to apologize for the sun beams across it.

table runner

Monday, March 21, 2011

Fun with Sergers?

Blogging Jill

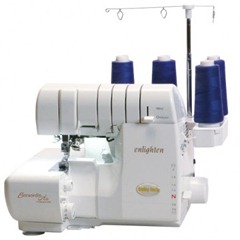
Over the weekend, MrBeans accompanied me to my local sewing machine shop while I picked up some supplies.  Digging around for gift ideas, he asked me if there’s anything I might like.  Without hesitating, and possibly subliminally prompted by the one in front of me, I said, “A serger, of course!”  

Of course I want a serger; what sewista is complete without one?  Though, I don’t need one.  But by some total twist of uncanny fate, day one of a two day serger class was being held in the shop at that very moment.  Quickly drawn into the classroom by the friendly shop keepers, I was instantly immersed into a garment making frenzy and the latest and greatest trends in sergers.  Maybe I do need one…

Babylock-Enlighten-Overlocker-430x430

Then, once I saw how the Baby Lock sergers magically thread themselves, it was a no brainer.  I had to have one!

If it wasn’t for the voice of reason (aka MrBeans,)  I would have swept that bad boy up into my arms and taken it home with all the extras and goodies only available for the limited time special weekend price of $$$$.  $$$$!  Falling off of cloud 9, I realized I really don’t need one, now.

So tonight, while dreaming of sergers, I enjoyed embroidering another cute, little onesie.

DSC01541

Monday, March 14, 2011

Onesie, Twosie, Threesie…Eightsie, Tensie

Jill and Polly

Lately, I’ve been overrun by onesie orders.  These are all the ones I’ve made in the past week and a half.  Not much time for other projects!

sewbeans onesie

i heart papa

new onesie

Saturday, January 29, 2011

Clutch!

jill's hat

Trying to fight off the winter doldrums, it seems I’ve been spending too much time huddled in front of the stove and not enough by the warmth of my sewing machine light.  Apparently, it’s not a very warm light.  But prompted by the sale of a few Bean’s Clutches in my Etsy shop, I decided I better move away from the stove and make more before I’m all sold out.  So I turned up the heat (my creative juices and thermostat) and got to work!

Beans' Clutch

In a matter of a few nights this week, I was able to crank out 10 clutches, managing to use up all the oil cloth in my stash!  Which probably means that there won’t be any more Bean’s Clutches for a while.  Not a big deal.  I’ve been putting so many projects on the backburner, and I’d like to push my shop aside for a little while to get them done.  I’ve cleared a lot of items out of my online inventory, and I keep my fingers crossed that my onesie don’t get discovered by more than the occasional trickle of buyers.  I packed up the remaining scraps from my Bean’s Clutches and some fabric I purchased for new products and they’re off to the closet!

fabric bin

Sunday, December 5, 2010

Fire Department Bust

Jill

Happy December!  I’m almost ready to start wrapping up my Christmas shopping and am looking forward to decorating the house! (When I’ll find time to do both is another question.)  I haven’t made any sales on my Etsy site for 2 months! and have been just as lazy about blogging my craft and sewing projects!  It’s fun to have a break!

Displaying my wares.

Yesterday, I set up a table at a local Fire Department’s craft fair.  I shared a table with a friend (she’s a Thirty-one consultant,) and marked down everything I had to rock bottom prices hoping for lots of sales.  She assured my that she’d seen the fair advertised everywhere.  Apparently, she was the only one.  I didn’t make a single sale, and it seemed that the vendors (about 50 of us) were the primary patrons to the other vendors.  Total bust.

dough balls rolling cookies jewel box cookies

The day wasn’t a total loss.  I made Smucker’s Jewel Box Cookies for dessert.  A simple butter cookie with jam will turn any frown upside down!

Monday, November 15, 2010

1 Block Down, 13 to Go

Jill Upside Down   

Everything is on hiatus until I finish this quilt top!

Pinwheel Block

Sunday, November 14, 2010

It’s a snap!

Jill, trying to keep the glare from her computer off her glasses.

I got a new toy, I mean, tool last week and finally took it out of the packaging for a test drive.  It’s my very own Dritz Pliers!  You know, for adding snaps to all my craft projects, in a snap, of course!


my snap pliers

Many thanks goes to Annie Rose’s online tutorial from Cowgirl Snaps for helping me avoid any frustration that these pliers would have encumbered upon me.  After carefully reading, and re-reading the tutorial, I’m feeling confident that I can snap together anything!

My first snap! Now you can tell it's a little bent...

I smartly practiced my new tool on some scrap fabric first. My first (half) snap came out a little wonky.  I persisted, re-read the tutorial, and went a little more slowly with the second snap.

A much better snap.

That one came out much better; however, I realized I could go back to my original snap, ply again, and get it to straighten out a little bit.   Actually, enough to look good!

Snaps in a snap! 

The little nubby part of the snap (the other half) went in perfectly.  Third time’s a charm!  I can’t wait to order some snaps from Cowgirl Snaps on Etsy and add snaps to everything!  <evil laugh>

Thursday, November 4, 2010

Boarder Crossing

Jill in the leaves.

My sewing machine whirled and hummed away tonight; so, I’m back to blogland with the results, just as I had promised myself!

Fat Quarter Quilt

I can’t believe I finally finished this quilt top!  (All I had left was to cut out and sew on the outer boarder…I’m 99% positive the center of it has been done for a year.)  I think I’m going to call it my Wonderland Quilt because of the bright colors and varied floral patterns.  It seems very curious to me. 

One thing I discovered tonight is that it’s very difficult to photograph a large quilt.  It’s tough to get the whole quilt in one frame, with the right lighting, not on a skewed angle and keeping the cat off it all at the same time.

Polly was looking for attention.

Saturday, October 16, 2010

Check Engine Light

Jill

While sewing last week, the “check engine light” on my sewing machine turned on.  And yes, it’s just as annoying as when it turns on in the car.  Sure, you can keep sewing…or your can bring it into the dealership and expect to hand over your wallet when you want it back.  Well, being that I probably care more about my sewing machine than my car, I sadly dropped it off at my local sewing machine shop.  Back at home, unable to sew and unmotivated to clean, I took a nap most of the afternoon.  :)

SewBeans custom embroidered onesie.

To get my sewing fix in, I took care of one last onesie before dropping it off.  I hope my machine’s not gone long!

Thursday, October 14, 2010

The Handmade Laptop Bag

Jill  

I made a foolish decision. I purchased a 17” laptop.  This was foolish, because almost no where, on God’s green earth, can one find a laptop bag big enough to fit such a monstrosity of a computer.  At the time, I had no clue I would run into such a debacle.  I, blinded by the large screen and number pad, possessed not a clue into the lack of portability that would ensue when purchasing these features. So I’m sure you can figure out what I did…

A Laptop Bag Designed by Me!

I graciously helped myself to my stash of fabric make a perfectly sized laptop case for my over-sized, “portable” computer.

If you can manage to follow my steps, you may be inclined to try to make your own.  I used a 1/2” seam allowance and happily finished with a functional laptop bag.

Step 1: Seclecting the perfect fabrics.

I decided to use one of my prized Heather Ross fabrics, Natural Roses from Far Far Away 2, and some leftover blue fabric from the back of a quilt I haven’t quite finished yet…
Step 2: Cutting pieces for the inner lining and outside. I based the construction of the bag on a box with an open top.  I carefully measured around each edge of my laptop, then cut each side, adding to the length and width an 1 inch for seam allowances and 1/2 fudge factor.  (I couldn’t imaging going through all this trouble for the bag to be too small!)
Step 3: Practice by making the lining first. I made two sets of fabric boxes, one for the inner lining and one for the outer.  I made the inner lining first to test my design.  I sewed together the four sides of the box, then the bottom.  Before sewing on the bottom, I carefully pinned it in place.
Step 4: Make sure the laptop will fit in the bag! I anxiously “tried on” the laptop bag by slipping my computer into the lining.  It fit!
Step 5: Add some cushioning. Next, to add a little extra padding, I basted batting onto the inside of each outside bag piece.
Step 6: Create some unique handles. Using the top edge of my largest side, I sketched a creative shape for my handles on some trace paper.  With some fancy folding (in half) I was able to make them symmetrical.  (Please be aware that these handles serve a more aesthetic purpose than functional.)
Step 7: Add your own whimsy and charm. For fun, I was inspired by the Velveteen Rabbit and appliqué a little bit of whimsy on to my bag.
I created the outer shell of my laptop bag by duplicating my inner lining box construction, and sewed together the sides, then pinned and sewed on the bottom.
Step 8: Create and attach a flap for securing the bag closed. I created a flap for the top of my laptop bag, being careful to make sure it fit between my handles.  I made the flap close with a button hole, because I was nervous that if I tried velcro, the pieces wouldn’t line up.  I’m mad at myself for forgetting to switch from my basting thread to my finish thread.  Luckily, I remembered before stitching around the edge.
Step 9: Sew it all together. After basting on the flap between the back handle, I put the exterior bag into the lining and sewed around the top.  Through a hole in the side of the lining, I flipped the bag right sides out and lining sides in.
Step 10: Finishing Touches I edge stitched around the top for a finished look, then carefully attached the button into place
Now that's a handmade laptop bag! Now, I have a super cool, handmade, and one-of-a-kind laptop bag.  I think it’s really awesome!

Saturday, September 25, 2010

Junk Drawer No More

Jill

With summer over, Indian Summer wanes on, and I spent most of September fully well knowing where my rotary cutter has been: in the drawer unused.  Today, I’m back faithful bleaders!  (Short for “blog readers.”  I’m halfway through Julie & Julia and couldn’t resist the reference.)  I just finished another project from One-Yard Wonders and it’s already been put to good use!

Junky Junk Drawer Organized Junk Drawer

My kitchen drawer this morning.

My kitchen drawer now!

Yet another project I started *mumble mumble* months ago, I am more proud that I’m finished and organized then I am annoyed at the pattern. 

Step 1: Prepare the Interfacing

The first step in the Origami Organizer pattern requires a lot of measuring and marking on a 30”x30” square of interfacing.  Unable to purchase a wide enough piece, I opted to overlap two pieces and pin them together.  So this afternoon, I sprawled out on my living room floor and measured and marked a piece of interfacing that was resistant to being measuring and marked.  I originally abandoned the project on this step, but determination to organize my junk drawer prevailed.

Step 4: Precrease the Grid Lines

Once I got past the initial disgust of the interfacing, my first fabric origami project started to take shape.

Step 5: Fold the BoxThe too quick folding and sewing steps were fun and gratifying, but soon, a slower paced hand stitch lead me to a grumpy finish.  The bottom piece, described in the book as “slightly smaller than the box,” was (big surprise) not quite big enough.  For the benefit of my junk drawer, I stitched it on anyway.  I suppose this project wouldn’t have made the book if you needed a “yard of fabric plus and inch.” 


Finished Origami Organizer in Hope Valley Diamond Dandy by Denyse Schmidt Designs

In the end, it may not fit this perfectionist’s high standards, but boy does it organize junk!